Dental hygienists learn a ton of information about head and neck anatomy, pharmacology, radiography, dental materials, and everything in between. However, we may have forgotten a thing or two along the way. That’s okay! We are human! Brushing up in a few areas can be a nice reminder whether you’ve been out of hygiene school for a year or 20.
This brings us to a refresher on the patient education side of the profession – toothbrushing – one of the pillars of oral care.
Assess and Demonstrate
Thousands of toothbrushes are on the market, ranging in all shapes, sizes, and styles. The type of toothbrush is not a one-size-fits-all because of a patient’s specific needs. This is the same with toothbrushing methods.
During the dental hygiene assessment, you collect data to help determine which toothbrushing method would benefit your patient the most. Then, during the oral hygiene instruction phase of the appointment, you can use the well-known teaching technique: show-tell-do.
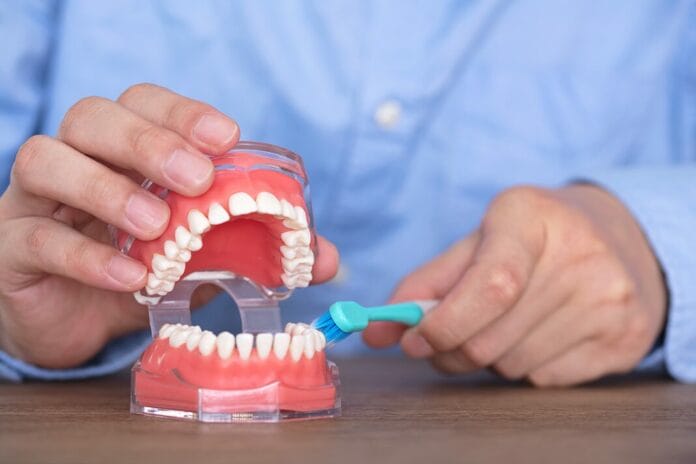
You can first demonstrate your chosen toothbrush method on a typodont, mouth model, or even in the patient’s own mouth, and give them a hand mirror to watch. You describe each step and then allow them to practice while you observe. Observing the patient’s brushing technique gives you the opportunity to make adjustments or provide tips to improve the patient’s skill.
Before the patient leaves, giving written instructions on what you demonstrated and discussed can also be of benefit so they do not forget. Plus, they can leave the instructions in their bathroom as a good reminder. Many organizations and manufacturers have written instructions with pictures and step-by-step instructions. The American Dental Association has a very straightforward infographic on its website.1 Or, you can make one yourself.
Toothbrushing Methods
There are several toothbrushing methods and variations of each. Your toothbrush method recommendations may change or need to be adjusted over time for your patients based on their needs. For any method used, brushing for at least two minutes twice daily with a soft-bristled toothbrush is recommended. Complete coverage of all tooth surfaces should be ensured. Vigorous scrubbing back and forth (scrub-brush method) with force is not recommended.
Bass Method: Sulcular Brushing
With the Bass method, the toothbrush bristles are at a 45-degree angle apically, with the bristle tips gently directed into the sulcus. Using short, vibratory strokes to brush, the bristles should remain directed toward the sulci without them.2
This method can be used for many patients to remove biofilm adjacent to the gingival margin. It is indicated for open embrasures, cervical areas beneath the height of the contour of the enamel, and exposed root surfaces. The Bass method is also indicated for adapting to abutment teeth, under the border of a fixed partial denture, and orthodontic appliances. Additionally, whether active or in maintenance treatment, those with periodontal disease can benefit from this method.2,3
The Stillman Method
The Stillman method is similar to the Bass method regarding angulation, but the bristles are partially on the tooth and partially on the adjacent gingiva. Short back-and-forth vibratory, rotary, or zig-zag strokes are employed, and the brush head is moved occlusally with light pressure. Upon placing the bristles on the gingiva, pressure should be enough to cause blanching.2-4
The Stillman method is indicated for patients with gingival recession and a need for gingival stimulation. This method gives a “gingival massage” effect, which increases blood circulation and promotes the healing of inflamed tissue. Additionally, this method removes biofilm from the cervical areas below the height of the contour of the crown and exposed proximal surfaces.2-4
Charters Method
The Charters method is similar to the Bass and Stillman method in angulation. However, rather than angling the toothbrush head 45 degrees apically, the bristles are directed away from the gingiva toward the occlusal or incisal edge of the tooth. Short, back-and-forth vibratory strokes are used to remove biofilm.2
The Charters method is usually recommended for individuals undergoing orthodontic treatment, those with healing surgical sites, or fixed appliances. This method loosens debris and biofilm while also stimulating marginal and interdental gingiva. This method is ideal for open embrasures, following periodontal surgery, and removing biofilm from abutment teeth of fixed bridges and implant-supported bridges.2,3
Modifications are necessary for those undergoing orthodontic treatment with fixed appliances. Using the same angulation and stroke as the Charter method, fixed appliances should be brushed with bristles angled toward the bracket, directed away from the gingiva. Then, brushing should occur the opposite way using the Stillman method with bristles angled toward the bracket, directed away from the incisal or occlusal aspect. To summarize, brushing should occur from below, above, and over the brackets and archwire. In addition, the Bass method should be used to remove biofilm along the gingival margin. Combining brushing methods can help achieve more effective biofilm removal on all surfaces.2-4
Rolling Stroke Method: Modified Bass, Stillman, and Charters Methods
The rolling stroke is to be used in conjunction with a vibratory technique, such as the Bass, Charters, or Stillman methods. The bristles are angled the same way as the Bass and Stillman methods at a 45-degree apically, followed by a rolling motion by turning the wrist vertically towards the occlusal/incisal surfaces. After proper placement, use enough pressure to make the gingiva blanch before rolling the brush slowly over the teeth.2,3
The rolling stroke method is recommended for patients who do not have specific oral problems or appliances. In addition, this method is helpful for brushing the lingual surfaces of the anterior teeth, just with more of a vertical or gentle scooping motion. This method successfully removes biofilm, material alba, and food debris without emphasis on the gingival sulcus. Therefore, if emphasis is needed on the gingival sulcus, it may be necessary to use this method in conjunction with another method, as mentioned before.2-4
I usually incorporate this method alongside the other toothbrush methods, such as the Bass and Stillman. I explain this method as a finishing stroke, angling the bristles towards the gingival margin. The patient then does a gentle rolling stroke (for the mandibular teeth, strokes up and the maxillary, strokes down), such as when petting a dog or painting a picture.
Fones Method
Dr. Fones, who created the Fones method, was a pediatric dentist. He attempted to create an effective and easy method for children to employ. The Fones method involves circular motions around the teeth. This motion tends to be easier for children than the sweeping motion used in other techniques.2,3
While slightly closing the mouth, place the toothbrush at a 90-degree angle to the long axis of the teeth while pressing the bristles gently against the teeth. Bristles are then moved in a circular motion several times in each area before moving the brush to a new area to cleanse. Horizontal strokes can be used on occlusal and lingual surfaces, as the circular motion is difficult to accomplish in these areas.2,3
The Fones method is indicated for children with primary teeth only. It is not recommended for adults or mixed dentition. Efficiency for biofilm removal is lowest with the Fones method compared to the sulcular and horizontal brushing methods, so when the child has better dexterity, a new method should be taught and used for better biofilm management.2,3
I have seen this method implemented in two ways. One is brushing in ‘big circles’ where the toothbrush motion touches both the maxillary and mandibular teeth on one side. The other Fones method is smaller circles, touching one to two teeth in one arch at a time.
Other Considerations
During OHI, you can use the home care products you will give your patient. When choosing individualized home care products, considerations include toothbrush type, toothpaste, interdental aids, and mouth rinses. Having a conversation with your patients about the different types of manual and electric toothbrushes is a great introduction to this portion of OHI.
When selecting the right toothbrush, you may want to consider the size of the handle and head. If a patient has dexterity issues, a thicker handle may feel more comfortable in their hand. There are also many alternative handles for dexterity issues or those with specialized needs.3
For a patient with a smaller mouth, partially or fully erupted wisdom teeth, or limited opening, a smaller toothbrush head can help reach areas of the mouth. Another consideration is the softness of the bristles. The more common recommendations from dental professionals are either soft or extra soft.3
Besides manual toothbrushes, many electric toothbrushes are available. The toothbrushing method may change slightly while the electric toothbrush does the proper motion (vibration) for the patient, but angulation and placement still apply. I add a rolling or finishing stroke after using my electric toothbrush.3
Educate your patients on what features they should look for when shopping for a new electric toothbrush. Some features may include the shape of the toothbrush head, such as a more circular shape or a more traditional shape, pressure sensors, and data collection using an app that can present the user with tips on improving their brushing or the amount of time brushing.3
Also, do not forget to remind your patients to replace their toothbrushes or electric toothbrush heads. The general recommendation for toothbrush replacement is at least every two to three months.3 However, filament wear varies considerably from person to person, so it has been suggested that rather than using the usual two- to three-month replacement recommendation, patients should instead be educated on identifying visible signs of worn filaments as an indicator of time to replace.2
In Closing
Brushing technique may seem commonplace to hygienists, even if we need an occasional refresher. Still, you may be surprised how many of your patients are not brushing properly and forget these small details.
Before you leave, check out the Today’s RDH self-study CE courses. All courses are peer-reviewed and non-sponsored to focus solely on high-quality education. Click here now.
Listen to the Today’s RDH Dental Hygiene Podcast Below:
References
- Brushing Your Teeth. (n.d.). American Dental Association. https://www.mouthhealthy.org/all-topics-a-z/brushing-your-teeth
- Duncan, T. B. & Bowen, D. M. (2020). Toothbrushing. In J. A. Pieren & D. M. Bowen, Darby and Walsh Dental Hygiene (5th ed., pp. 368-376). Saunders.
- Reid, H. L., & Boyd, L. D. (2023). Oral Infection Control: Toothbrushes and Toothbrushing. In L. D. Boyd & L. F. Mallonee, Clinical Practice of the Dental Hygienist (14th ed., pp. 476-482). Jones and Bartlett Learning.
- Agrawal, N., Kishore, A., Sharma, K., et al. Toothbrushes and Tooth Brushing Methods: A Periodontal Review. Clin Stud Case Rep. 2022; 9: 0129. https://www.heraldopenaccess.us/openaccess/toothbrushes-and-tooth-brushing-methods-a-periodontal-review

